Thứ Bảy, 19 tháng 9, 2020

Extend Selenium grid - get list free node from selenium grid


Giới thiệu

Selenium grid là một trong các bộ testing tool của Selenium. Nó giúp chạy nhiều kịch bản test trên nhiều device, browser, máy trong cùng một lúc. 

Có hai lý do chính để bạn cân nhắc việc sử dụng Selenium Grid cho các dự án của mình đó là:
  • Các kịch bản test của bạn yêu cầu phải được kiểm tra trên nhiều trình duyệt khác nhau, nhiều hệ điều hành và trên nhiều máy test khác nhau trong cùng một lúc. Việc này để đảm bảo là các ứng dụng của bạn tương thích với các hệ điều hành cùng với các môi trường hoạt động khác nhau.
  • Hai là, để tiết kiệm thời gian thực hiện bộ test case.  Ví dụ, ứng dụng của bạn cần phải test trên 4 trình duyệt khác nhau, thông thường cùng với 1 test case bạn phải chạy 4 lần, nhưng với Selenium Grid thì bạn chỉ cần chạy 1 lần!

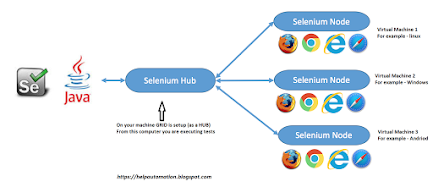
Hub và Node trong Selenium Grid

Hai thành phần cơ bản trong Selenium Grid gồm có Hub và các Node.
Trong selenium grid, Hub đóng vai trò là một máy tính trung tâm, nơi mà các kịch bản kiểm thử của bạn được load tới đó.Hub ở đây có vai trò là tìm các node có điều kiện tương ứng với yêu cầu đầu vào của bạn và chuyển các test case tới đúng môi trường cần chạy đó
Mỗi Grid chỉ nên có một Hub, và Hub này được khởi chạy trên một máy duy nhất.

Nodes là các máy test được kết nối với máy Hub, nó sẽ thực hiện run các kịch bản kiểm thử mà bạn đã load lên Hub. Trong một grid bạn có thể xây dựng một hoặc nhiều node.

Đặt vấn đề

Làm sao để biết node nào đang available để chỉ định run test case trên node đó ?

Tìm hiểu

Ta thấy selenium grid có hiển thị trạng thái node nhưng chỉ ở giao diện web chứ ko có support api nào để get theo kiểu json.

Tuy nhiên ở selenium có support một số tính năng sau:
- Xây dựng một new servlet
- Cung cấp một Prioritizer
- Provide a new Capability Matcher
- Provide a new RemoteProxy

Để giải quyết vấn đề ở trên ta chỉ cần export một api get list free node bằng cách sử dụng servlet

Version thực hiện

Java: jdk 8
Selenium: 3.141.59

Cách thực hiện

<?xml version="1.0" encoding="UTF-8"?>
<project xmlns="http://maven.apache.org/POM/4.0.0"
xmlns:xsi="http://www.w3.org/2001/XMLSchema-instance"
xsi:schemaLocation="http://maven.apache.org/POM/4.0.0 http://maven.apache.org/xsd/maven-4.0.0.xsd">
<modelVersion>4.0.0</modelVersion>

<groupId>org.example</groupId>
<artifactId>selenium-grid-extend</artifactId>
<version>1.0-SNAPSHOT</version>
<packaging>jar</packaging>

<dependencies>
<dependency>
<groupId>org.seleniumhq.selenium</groupId>
<artifactId>selenium-server</artifactId>
<version>3.141.59</version>
</dependency>
<dependency>
<groupId>com.google.code.gson</groupId>
<artifactId>gson</artifactId>
<version>2.8.6</version>
</dependency>
</dependencies>
</project>

Để get status node ta sử dụng kế thừa từ class RegistryBasedServlet

package selenium.extend.hub.servlet;

import com.google.gson.Gson;
import com.google.gson.JsonArray;
import com.google.gson.JsonObject;
import com.google.gson.JsonSyntaxException;
import java.io.IOException;
import java.util.Iterator;
import javax.servlet.ServletException;
import javax.servlet.http.HttpServletRequest;
import javax.servlet.http.HttpServletResponse;
import org.openqa.grid.common.exception.GridException;
import org.openqa.grid.internal.GridRegistry;
import org.openqa.grid.internal.ProxySet;
import org.openqa.grid.internal.RemoteProxy;
import org.openqa.grid.web.servlet.RegistryBasedServlet;

public class AllNodesState extends RegistryBasedServlet {

public AllNodesState() {
this(null);
}

public AllNodesState(GridRegistry registry) {
super(registry);
}


  @Override
  protected void doGet(HttpServletRequest request, HttpServletResponse response) throws ServletException, IOException {
process(request, response);
}

protected void process(HttpServletRequest request, HttpServletResponse response) throws IOException {
response.setContentType("application/json");
response.setCharacterEncoding("UTF-8");
response.setStatus(200);

try {
JsonObject res = getResponse(request);
response.getWriter().print(res);
response.getWriter().close();
} catch (JsonSyntaxException e) {
throw new GridException(e.getMessage());
}
}

private JsonObject getResponse(HttpServletRequest request) {
ProxySet proxies = super.getRegistry().getAllProxies();
return getNodes(proxies);
}

private JsonObject getNodes(ProxySet proxies) {
Iterator<RemoteProxy> itr = proxies.iterator();
Gson gson = new Gson();

JsonArray freeProxies = new JsonArray();
JsonArray busyProxies = new JsonArray();

while (itr.hasNext()) {
RemoteProxy proxy = itr.next();
JsonObject proxyJson = new JsonObject();
proxyJson.add("nodeName", gson.toJsonTree(proxy.getOriginalRegistrationRequest().getConfiguration().capabilities.get(0).asMap().get("nodeName")));
proxyJson.add("udid", gson.toJsonTree(proxy.getOriginalRegistrationRequest().getConfiguration().capabilities.get(0).asMap().get("udid")));
proxyJson.add("platform", gson.toJsonTree(proxy.getOriginalRegistrationRequest().getConfiguration().capabilities.get(0).asMap().get("platform")));
proxyJson.add("browserName", gson.toJsonTree(proxy.getOriginalRegistrationRequest().getConfiguration().capabilities.get(0).asMap().get("browserName")));
System.out.println("node info" + proxy.getOriginalRegistrationRequest().getConfiguration().capabilities);
if (!proxy.isBusy()) {
freeProxies.add(proxyJson);
} else {
busyProxies.add(proxyJson);
}
}

JsonObject nodeJson = new JsonObject();
nodeJson.add("freeNodes", freeProxies);
nodeJson.add("busyNodes", busyProxies);

return nodeJson;
}
}

Start Hub bằng command line

java -cp selenium-grid-extend-1.0-SNAPSHOT.jar:selenium-server-standalone-3.141.59.jar:gson-2.8.6.jar org.openqa.grid.selenium.GridLauncherV3 -role hub -servlets "selenium.extend.hub.servlet.AllNodesState"


Start node


Check kết quả

Kết quả hiện thị trên browser

Call API get list node


Kết luận

Như vậy có thể lấy được trạng thái các node đang kết nối tới hub một cách dễ dàng

Reference

https://www.slideshare.net/seleniumconf/introduction-to-seleniumgridworkshop

Thứ Bảy, 12 tháng 9, 2020

Giải thuật quicksort


Quicksort is a divide and conquer algorithm. It first divides a large list into two smaller sub-lists and then recursively sort the two sub-lists. If we want to sort an array without any extra space, quicksort is a good option. On average, time complexity is O(n log(n)).

The basic step of sorting an array are as follows:

  • Select a pivot
  • Move smaller elements to the left and move bigger elements to the right of the pivot
  • Recursively sort left part and right part

This post shows two versions of the Java implementation. The first one picks the rightmost element as the pivot and the second one picks the middle element as the pivot.

Version 1: Rightmost element as pivot

The following is the Java Implementation using rightmost element as the pivot.

public class QuickSort {
 
    public static void main(String[] args) {
        int[] arr = {4, 5, 1, 2, 3, 3};
        quickSort(arr, 0, arr.length-1);
        System.out.println(Arrays.toString(arr));
    }
 
    public static void quickSort(int[] arr, int start, int end){
 
        int partition = partition(arr, start, end);
 
        if(partition-1>start) {
            quickSort(arr, start, partition - 1);
        }
        if(partition+1<end) {
            quickSort(arr, partition + 1, end);
        }
    }
 
    public static int partition(int[] arr, int start, int end){
        int pivot = arr[end];
 
        for(int i=start; i<end; i++){
            if(arr[i]<pivot){
                int temp= arr[start];
                arr[start]=arr[i];
                arr[i]=temp;
                start++;
            }
        }
 
        int temp = arr[start];
        arr[start] = pivot;
        arr[end] = temp;
 
        return start;
    }
}

You can use the example below to go through the code.

Version 2: Middle element as pivot

public class QuickSort {
	public static void main(String[] args) {
		int[] x = { 9, 2, 4, 7, 3, 7, 10 };
		System.out.println(Arrays.toString(x));
 
		int low = 0;
		int high = x.length - 1;
 
		quickSort(x, low, high);
		System.out.println(Arrays.toString(x));
	}
 
	public static void quickSort(int[] arr, int low, int high) {
		if (arr == null || arr.length == 0)
			return;
 
		if (low >= high)
			return;
 
		// pick the pivot
		int middle = low + (high - low) / 2;
		int pivot = arr[middle];
 
		// make left < pivot and right > pivot
		int i = low, j = high;
		while (i <= j) {
			while (arr[i] < pivot) {
				i++;
			}
 
			while (arr[j] > pivot) {
				j--;
			}
 
			if (i <= j) {
				int temp = arr[i];
				arr[i] = arr[j];
				arr[j] = temp;
				i++;
				j--;
			}
		}
 
		// recursively sort two sub parts
		if (low < j)
			quickSort(arr, low, j);
 
		if (high > i)
			quickSort(arr, i, high);
	}
}

Output:

9 2 4 7 3 7 10
2 3 4 7 7 9 10

Here is a very good animation of quicksort.

ref: https://www.programcreek.com/2012/11/quicksort-array-in-java/

Thứ Ba, 20 tháng 12, 2016

IntelliJ does not show 'Class' when we right click and select 'New' (không định dạng file java trong intellij)


down voteaccepted
The directory or one of the parent directories must be marked as Source Root (In this case, it appears in blue).
If this is not the case, right click your root source directory -> Mark As -> Source Root.

Thứ Hai, 28 tháng 11, 2016

Resources for article extraction from HTML pages

Research papers and Articles for article extraction from HTML pages

Some good blog articles:
 The Easy Way to Extract Useful Text from Arbitrary HTML. The author is using examples written in python to employ a fairly similar technique described in the text-to-tag ratio paper listed above. The original link is dead, here is a copy: http://www.cnblogs.com/loveyakamoz/archive/2011/08/18/2143965.html

Software for article extraction from HTML pages

code is here:
http://code.google.com/p/boilerp…
It has been integrated into Apache Tika as well
Demo Web Service: http://boilerpipe-web.appspot.com/
Java library: http://code.google.com/p/boilerp…
Research presentation (WSDM 2010): http://videolectures.net/wsdm201…

Thứ Tư, 16 tháng 11, 2016

sửa lỗi The superclass "javax.servlet.http.HttpServlet" was not found on the Java Build Path


Resolution:

bước một click vào project chọn property


bước 2 : search face, chọn tab runtime


 chọn server để biên dịch rồi okie


Chủ Nhật, 6 tháng 11, 2016

Nên dùng Array.forEach hay for trong Javascript?

- về nguyên tắc thì sử dụng cái nào cũng được . tuy nhiên về tốc độ thì dùng for được đánh giá cao về tốc độ, thực hiện test trên trang https://jsperf.com ta sẽ thấy đều đó

arr.forEach(function (item) {
  someFn(item);
})
for (var i = 0, len = arr.length; i < len; i++) {
  someFn(arr[i]);
}


Use:kết quả cho thấy 
tham khảo thêm tại :
https://coderwall.com/p/kvzbpa/don-t-use-array-foreach-use-for-instead

Thứ Sáu, 28 tháng 10, 2016

fix lỗi 404 error của wordpress khi thiết lập đường dẫn tĩnh

Để thiết lập đường dẫn tĩnh cho website trong Wordpress ta vào  Settings->Permalink:


Giải thích thêm:

  • Common Settings: Các thiết lập thông dụng.
  • Plain: Cấu trúc đường dẫn mặc định (đường dẫn động).
  • Day and name: cấu trúc đường dẫn với kiểu hiển thị đầy đủ ngày tháng đăng post và tên post.
  • Month and name: cấu trúc đường dẫn với kiểu hiển thị tháng, năm và tên post.
  • Numeric: Cấu trúc đường dẫn hiển thị ID của post thay vì tên.
  • Post name: Chỉ hiển thị tên post trên đường dẫn
  • Custom Structure: Cấu trúc được xác định ở đây thông qua các từ khóa cấu trúc (được bọc bởi ký tự %)
  • Optional: Các thiết lập tùy chọn không bắt buộc.
  • Category base: Tên đường dẫn mẹ của các đường dẫn tới trang category. Mặc định nó sẽ là http://domain/category/tên-category/, nếu bạn điền “chuyen-muc” vào đây thì nó sẽ hiển thị là http://domain/chuyen-muc/tên-category.
  • Tag base: Tên đường dẫn mẹ của đường dẫn tới các trang tag. Mặc định nó sẽ là http://domain/tag/tên-tag/, nếu bạn điền “the” vào đây thì nó sẽ hiển thị là http://domain/the/tên-tag.

Tiếp theo là bật chức năng rewrite trong wampserver: click trái vào biểu tượng wampserser ở system tray tiếp theo chọn Apache -> apache modules ->  check vào rewrite_module

Okie, như vậy là đã hoàn tất

tham khảo thêm video: